Posts

Extend Your iPad Battery Life

Apple has a specific time duration that each iPad Battery should last based on regular usage, but actually reaching that value is quite a task. In this article we are going to explore a few popular methods to accomplice that.


The reason behind the disconnect is the software. Even though Apple creates great hardware, their software is a bit lacking. It’s common for us to see a 64 GB iPhone running out of space even when using iCloud for storing everything.


In addition, there are a whole bunch of iPad models out there right now all with different versions of iOS installed, which is problematic. An iPad Air 2 can be updated to iOS 10, but an iPad 2 can only be updated to iOS 9 currently.


In this post, We'll list out as many ways we know possible to improve the battery life of your iPad by adjusting settings in iOS. we'll try to make a note if the feature is not available in an older version of iOS.


Method 1 – Adjust Auto Brightness


Obviously, while you are using your iPad, the screen itself will be the biggest drain on the battery. The screen itself uses about 90%+ of the battery, unless you need maximum brightness consider dialing it down a bit.


Firstly, it just hurts our eyes to have the screen so bright in a indoor / dimly lit area. By default, the screen should adjust automatically, but we have found that many times it’s brighter than we need. Just swipe up from the bottom of the screen and you’ll see the brightness slider at the top right.


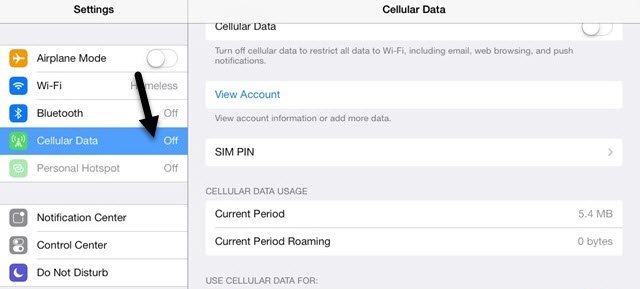
Method 2 – Disable Bluetooth & Cellular

Read more

Should You Ever Disable a Windows Service?

If you have ever searched for ways to make your Windows computer faster, you’ve probably run across several that suggest turning off or disabling certain Windows services. Other websites say it’s dangerous and you should never mess with Windows services. So, who is correct?


Well, the argument can be broken down into whether or not you know what you are doing. If you don’t know what a Windows service even is, then you really should not disable any service before researching it's function. If you have some basic understanding of services and programs, then it’s OK to disable only non-Microsoft services.

As a general rule, we never disable any service that comes installed with Windows by default or that is from Microsoft. If you think a service is unnecessary and might be slowing down your computer, you should Google it and then try to uninstall the program or Windows feature that is creating the service in the first place.


However, when you disable non-Microsoft services, your chances of messing something up on your computer are greatly reduced. Most of these third-party services don’t necessarily need to be enabled. They are usually there to check for updates in the background or something similar.


Windows Services Location


First off, there are two ways to view all the services on your Windows PC. You can go to Start and type in services to open the desktop app or you can type in MSCONFIG to open the system configuration utility.


Go ahead and click on the Services tab and you’ll see a list of all services with checkmarks next to each one. If you uncheck the service, it will be disabled the next time you restart the computer.


Read more

Use Deep Freeze to Restore Your PC on Boot

Ever wish you could undo all the changes your staff or kids have made to a PC? Or maybe you would like to install some software on your system to test it before purchasing, but you don’t know exactly what it will do?


Wouldn’t it be nice if you could just restart the computer and all the changes made were simply wiped out? Luckily, there is a way to do this using a program called Deep Freeze by Faronics.


Now you would be right if you looked at that page and thought that this is a program that is used by big companies or institutions. However, those are not their only customers. They sell a standard edition of the program which is cost-effective considering the benefits.


We’ve spent a lot more on software and have normally been disappointed. That’s why nowadays we only use freeware or purchase subscription software like Adobe Creative Cloud. However, this is one program we can recommend purchasing because there simply isn’t a freeware that can do the same thing in such a convenient way.


deep-freeze


It’s worth noting that we have not been asked to write this review by Faronics. We decided to try it out on our test PC that we use for installing test software and it’s made life a lot easier.


Features and Benefits

Read more

7 Tips for Windows Users on Mac

If you recently purchased a Mac or if you have been required to use a Mac for work, you might be frustrated trying to use OS X if you have been a long-time Windows user. This is completely understandable and Apple really doesn't care to change their OS to match that of Windows anytime soon.


Apple loves OS X the way it is and it will probably remain the way it is for the remainder of its life. This means you’ll need to get used to some of the differences between Windows and Mac. In my view, OS X could still be made to be easier to use by default, but unfortunately, you have to manually make some changes to make things better.


In this article, I’m going to give you a couple of my favorite tips for Windows users who have to use a Mac and OS X. Once you get used to OS X, you may even like it more than Windows, which is what happened to me. There is a small learning curve, but it’s worth the effort. Also, be sure to check out my post on programs and features in OS X that are equivalent to Windows.


Tip #1 – How to Right Click


One of the most annoying things as a beginner Mac user is trying to figure out how to right click! There is no separate right-click button for Macs and this can be really annoying for some people. Luckily, the Apple method is actually kind of more intuitive and easier to use.


All you have to do to right-click is to use two fingers when you perform a normal click. When you click with two fingers, you get the right-click context menu. For me, this is way more convenient than having to move my finger all the way down to the correct button like on most Windows laptops.


You can change the settings for how right-click works by going to System Preferences – Trackpad and clicking on the Point & Click tab.


By default, the right-click option is called Secondary click in OS X. If checked, it is normally set to Click or tap with two fingers, but you can click on the small little arrow and choose from two other options also: Click in bottom right corner or Click in bottom left corner. If you just love the way you did it in Windows, you can tweak OS X to get the same behavior.


Also, another quick tip is to check the Tap to click option also. Most Windows laptops allow you to tap to click, but OS X does not have this enabled by default so you have to manually press down the button to click. If you go to Scroll & Zoom, you can also change the scroll direction to whichever is more natural for you.


Tip #2 – Add Applications to the Dock


Read more

How to Enable Flash in Chrome for Specific Websites

If you’re a Chrome user, which you should be, you probably have noticed that Flash is blocked by default in the browser. Google does not like Flash because of the major security flaws inherent in Flash and therefore does everything in its power to force you not to use Flash.


The problem is there are still a lot of sites that use Flash. None of the major sites you visit every day like Facebook, Instagram, etc. use it, but a lot of smaller and older sites just haven’t bothered to switch to HTML 5. 

If you do a quick Google search for enabling Flash in Chrome, you’ll see a lot of articles telling you to download Flash from Adobe’s website and install it (which won’t work) or to open a Chrome tab and go to chrome://plugins (which also won’t work anymore). In the most recent version of Chrome (57), you can no longer manage plugins by going to that URL. Instead, you’ll just get a “This site can’t be reached” message.


Now it seems they only want you to enable it for the specific sites where it is needed. In this article, I’ll explain how to get Flash to work when you need it and how to keep it disabled otherwise.


Check Chrome Flash Settings


Read more

Change Default Download Folder on your Browser

By default, anything you download from a web browser will normally go to the Downloads folder on your computer. This is true regardless of the operating system you are running.


Most people will use the default location for downloads, but there are instances where it might be helpful to change this folder. For example, if you are downloading several large files and you don’t have enough storage space on the local disk, you can download the files to an external hard drive or to a network drive.


In this article, we’ll show you how to change the default download folder location for all the major browsers. It’s different for each browser and each browser has different options.


Read more

How to Configure AutoPlay in Windows

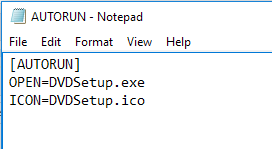
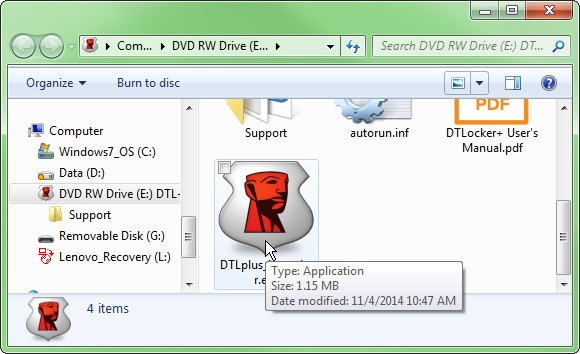
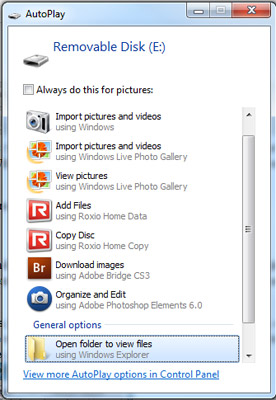
AutoPlay is a feature in Windows that will automatically scan a device when it is connected to your computer and based on your settings, will either perform a specified action or do nothing at all. In order to understand AutoPlay, though, you also have to understand another very similar feature called AutoRun.


Most people think AutoRun and AutoPlay are just two terms for the same thing, but that is not accurate. AutoRun is a feature that first came out in Windows 95, It's intended to make installing apps for non-technicians easier. If a CD contained a file called autorun.inf in the root directory, Windows would detect it automatically and follow the instructions in that file.


This file is normally very simple and basically just points to a file on the disc, usually the setup file or install file. Here is an example of one below:


In Windows XP and earlier, the file would be read and automatically run without any kind of prompt. If you have ever popped in an install CD/DVD for a piece of hardware or a program in Windows XP or earlier, it would just start running the setup program.


This obviously posed serious security risks and Microsoft introduced AutoPlay as a way to fix the problem. AutoPlay’s job is to examine a newly connected media device, determine what kind of content is on it, and then display a dialog that allows the user to launch an application to play, run or display the content.


Now depending on the operating system you are running, AutoRun and AutoPlay will work differently. In all versions of Windows earlier than Windows Vista, AutoRun is executed before AutoPlay, unless AutoRun is disabled. If it’s not disabled, AutoRun will execute and it will search for the AutoRun.inf file.


In Windows XP, if the autorun.inf file is found, AutoRun can go ahead and bypass AutoPlay altogether and launch the application without asking the user first.


In Windows Vista and higher, AutoRun cannot skip past AutoPlay. If there is an AutoRun.inf file, it will still be read, but instead of the application being launched automatically, a dialog box will pop up with a list of choices, some of which could be from the autorun.inf file.


AutoRun vs. AutoPlay Example


Read more

Keeping sensitive files Encrypted with you

How can you encrypt sensitive files that are stored on a flash drive or external hard drive?


Flash drives are easy to lose. And anything lost can fall into the wrong hands. So if you’re carrying around sensitive information in your pocket, you need to make sure those files are encrypted.


Below are three easy solutions:


1. Buy an encrypted drive


You can buy a flash drive with built-in encryption, such as the DataTraveler Locker+ G3. When you plug the Locker+ in, it comes up as a 13MB, read-only drive. But once you launch the program file on that drive and enter the password that you previously setup, another drive opens up with all the storage space you paid for.


That drive, of course, is inaccessible without the password. The software runs off the drive, and it can be used on multiple computers and operating systems.


But I strongly recommend against using this drive’s optional cloud backup feature. It uses Dropbox, OneDrive, or whichever cloud service you pick, which at first glance seems like a nice convenience.


But this feature uploads the files without its own encryption. That means you’re trusting your sensitive files to the encryption capabilities of Dropbox and similar 3rd party services and you have no control over the encryption methods. Find another way to backup these files—preferably one where you can can control the encryption.


The DataTraveler Locker+ G3 starts at about $15 for the 8GB drive, and we've looked at other encrypted USB drives as well. 


2. Install specialized software on your drive


Read more