Posts

7 Tips for Windows Users on Mac

If you recently purchased a Mac or if you have been required to use a Mac for work, you might be frustrated trying to use OS X if you have been a long-time Windows user. This is completely understandable and Apple really doesn't care to change their OS to match that of Windows anytime soon.


Apple loves OS X the way it is and it will probably remain the way it is for the remainder of its life. This means you’ll need to get used to some of the differences between Windows and Mac. In my view, OS X could still be made to be easier to use by default, but unfortunately, you have to manually make some changes to make things better.


In this article, I’m going to give you a couple of my favorite tips for Windows users who have to use a Mac and OS X. Once you get used to OS X, you may even like it more than Windows, which is what happened to me. There is a small learning curve, but it’s worth the effort. Also, be sure to check out my post on programs and features in OS X that are equivalent to Windows.


Tip #1 – How to Right Click


One of the most annoying things as a beginner Mac user is trying to figure out how to right click! There is no separate right-click button for Macs and this can be really annoying for some people. Luckily, the Apple method is actually kind of more intuitive and easier to use.


All you have to do to right-click is to use two fingers when you perform a normal click. When you click with two fingers, you get the right-click context menu. For me, this is way more convenient than having to move my finger all the way down to the correct button like on most Windows laptops.


You can change the settings for how right-click works by going to System Preferences – Trackpad and clicking on the Point & Click tab.


By default, the right-click option is called Secondary click in OS X. If checked, it is normally set to Click or tap with two fingers, but you can click on the small little arrow and choose from two other options also: Click in bottom right corner or Click in bottom left corner. If you just love the way you did it in Windows, you can tweak OS X to get the same behavior.


Also, another quick tip is to check the Tap to click option also. Most Windows laptops allow you to tap to click, but OS X does not have this enabled by default so you have to manually press down the button to click. If you go to Scroll & Zoom, you can also change the scroll direction to whichever is more natural for you.


Tip #2 – Add Applications to the Dock


Read more

Change Default Download Folder on your Browser

By default, anything you download from a web browser will normally go to the Downloads folder on your computer. This is true regardless of the operating system you are running.


Most people will use the default location for downloads, but there are instances where it might be helpful to change this folder. For example, if you are downloading several large files and you don’t have enough storage space on the local disk, you can download the files to an external hard drive or to a network drive.


In this article, we’ll show you how to change the default download folder location for all the major browsers. It’s different for each browser and each browser has different options.


Read more

How to Configure AutoPlay in Windows

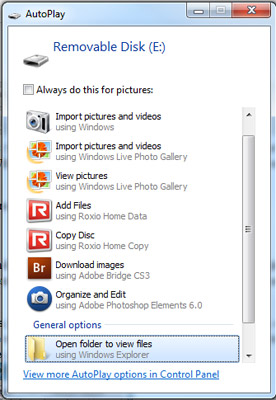
AutoPlay is a feature in Windows that will automatically scan a device when it is connected to your computer and based on your settings, will either perform a specified action or do nothing at all. In order to understand AutoPlay, though, you also have to understand another very similar feature called AutoRun.


Most people think AutoRun and AutoPlay are just two terms for the same thing, but that is not accurate. AutoRun is a feature that first came out in Windows 95, It's intended to make installing apps for non-technicians easier. If a CD contained a file called autorun.inf in the root directory, Windows would detect it automatically and follow the instructions in that file.


This file is normally very simple and basically just points to a file on the disc, usually the setup file or install file. Here is an example of one below:


In Windows XP and earlier, the file would be read and automatically run without any kind of prompt. If you have ever popped in an install CD/DVD for a piece of hardware or a program in Windows XP or earlier, it would just start running the setup program.


This obviously posed serious security risks and Microsoft introduced AutoPlay as a way to fix the problem. AutoPlay’s job is to examine a newly connected media device, determine what kind of content is on it, and then display a dialog that allows the user to launch an application to play, run or display the content.


Now depending on the operating system you are running, AutoRun and AutoPlay will work differently. In all versions of Windows earlier than Windows Vista, AutoRun is executed before AutoPlay, unless AutoRun is disabled. If it’s not disabled, AutoRun will execute and it will search for the AutoRun.inf file.


In Windows XP, if the autorun.inf file is found, AutoRun can go ahead and bypass AutoPlay altogether and launch the application without asking the user first.


In Windows Vista and higher, AutoRun cannot skip past AutoPlay. If there is an AutoRun.inf file, it will still be read, but instead of the application being launched automatically, a dialog box will pop up with a list of choices, some of which could be from the autorun.inf file.


AutoRun vs. AutoPlay Example


Read more

Startup Programs

Disable Unneeded Startup Programs in Windows 7, 8 & 10

Startup Programs

Disable Unneeded Startup Programs in Windows 7, 8 & 10

By Stephan Stemmett / Aseem Kishore
Startup Programs

It is irritating when you start up your computer and have to wait 10 minutes while all kinds of software loads up: Dropbox, antivirus, Chrome, Java, Apple, Adobe, graphics & printer drivers drivers, etc. If you have a lot of programs loading up that you don’t use immediately, then they are just slowing your computer down and should be disabled.


Most software prefer to load into memory as soon as Windows starts up, so that when you use it, it loads quicker. We would prefer your computer working sooner, rather than have a program you use once a week slow you down every day.


Disabling startup programs can increase the speed of your computer and usually will not adversely affect your computer because the software is loaded manually when you open a program.


Managing Startup Programs


You can manage your startup programs by opening the System Configuration Utility. Click on Start and then Run, type in msconfig and click OK. In Windows 7, you can just click on Start and type in msconfig. In Windows 8, the msconfig command brings up the System Configuration utility, but the Startup section now appears in Task Manager.


msconfig start


system configuration


Clicking on the Startup tab in Task Manager on Windows 8 or in the System Configuration dialog will bring up the list of startup items. In Windows 8, the list looks a bit different and it also gives you some extra info like the estimated impact the process has on the startup time.


Read more

Troubleshoot Windows from Safe Mode

Safe Mode

Troubleshoot Windows from Safe Mode

By Stephan Stemmett / Aseem Kishore
safe modeNeed to get into Safe Mode on your Windows PC? If you’re not able to boot your computer normally, you can try to enter safe mode, a diagnostic mode for Windows that lets you troubleshoot problems that prevent normal booting.


In Safe Mode, Windows only loads the most essential services and drivers in order for it to run. All other normal Windows settings and start up programs are disabled in order to allow the user to fix the problem with their computer.


In this guide, we're going to go through the steps to get into Safe Mode in Windows XP, Vista, 7, 8.1 and Windows 10.


Safe ModeNote that if you installed a driver or just recently made a configuration change to your computer, you may want to try the “Last Known Good Configuration” before going into safe mode in Windows 7, Vista and XP.


Last Known Good Configuration loads the last working version of Windows. However, it is replaced each time you log into the computer, so if a problem has occurred, make sure to try this option BEFORE logging onto the computer again.


Note that in Windows 8/10 the Last Known option is no longer included. Instead, they have other options like Refresh, Reset (Reinstall), Restore, etc. I’ll go into more details below in the Windows 8/10 section.


Also note that there are three types of Safe Mode, so read the descriptions below to figure out which one is best for you.


Safe ModeSafe Mode – The basic option that loads Windows with a GUI interface and is usually what most people should choose when troubleshooting their computer. Safe Mode loads only the minimal required Drivers & Windows Services.


Safe ModeSafe Mode with Networking – If you need access to the Internet or the network while in Safe mode, then this is the option to choose. This mode is useful when you need to fix a problem that requires an Internet connection so that you can download updates, drivers, or other files to help fix your problem.


Safe ModeSafe Mode with Command Prompt – This mode will load with just the MS DOS command line prompt. This is useful if you need to run a DOS command like fixboot or chkdsk.


Safe Mode

Safe Mode in Windows XP/Vista/7


To get into the Safe Mode in Windows XP, Vista or 7, re-boot the computer and then press and hold the “F8 Key” which will then bring up the “Windows Advanced Options Menu“. Scroll down to “Safe Mode” using the arrow keys and press Enter.


Read more

Reset your Lost or Forgotten Administrator Password in Windows

Reset Windows Password

Reset your Lost or Forgotten Administrator Password in Windows

By Stephan Stemmett / Aseem Kishore
ForgotPasswordIconWhat to do if you’ve forgotten your password? It’s never fun forgetting a password, especially if you have a lot of important data on your computer, but there are tools and methods that allow you to get access to your data without ever needing to know what the original password was.


Note, you will have to open command prompts & type DOS commands, but if you are an Existing IT Experts client, as long as you are on the Internet, we can also reset it for you at any time remotely.


Windows 7 & Windows 8.1 Reset Password


There are two ways you can go about resetting a password for a user account in Windows 7 and Windows 8.1. Both methods work on both operating systems, which is really convenient. The first method uses the Windows 7 or 8.1 installation DVD and the second method involves using a third-party tool. If you don’t have your install CD/DVD, then use the second method.


Get your supplied installation disc for Windows 7 or 8.1 and load it into your CD/DVD drive. Restart your computer and boot up from the disc. Note that you might have to change the boot order in your BIOS before the system will boot from the disc.


repair computer


For Windows 7, the first screen will make you pick your language, keyboard, etc. Just leave those as default and click Next. For Windows 8, it will be similar. On the next screen, you’ll see a Repair your computer link at the bottom. Click on that link.


Read more

13 Ways to Speed Up Windows Boot Times

Speed Up

13 Ways to Speed Up Windows Boot Times

By Stephan Stemmett / Aseem Kishore


Speed UpEvery day millions of Windows machines are booted up and everyday millions of people sit idly by waiting for Windows to load onto the desktop.


The amount of time wasted can probably be measured in weeks considering how slow most Windows PCs boot up! Luckily, there are a lot of steps you can take to speed your computer’s boot time.


In this article, we're going to mention 14 simple ways we use to speed up PCs and hopefully you’ll find that they work for you aswell. 


1. Free Up Disk Space

Speed UpOne thing we do on computers running slow is clean up the disk space. There are aspects of Windows that use up quite a bit of disk space like the recycle bin, system restore, hibernation file, backed up service-pack files, WinSxS folder, temp directories, etc.


treesize


On top of that, you might have a lot of data lying on your hard that you might be able to move to an external hard drive or delete, I.e. Duplicates of files, Old Irrelevant document & Backups, etc. 


Take the time to clean up files on your computer at least once a month.


2. Disable Visual Effects


Read more